
Node.js 前端應用
這篇主要要介紹 Node.js 前端的開發,使用 Webpack 做為例子
Webpack 用於模組打包工具,可以將 JavaScript、CSS 等資源打包成瀏覽器可以載入的靜態資源,優化前端的加載速度
以下我們示範使用 Webpack 打包 Lodash, 但啥是 Lodash ??
先簡單介紹一下 Lodash 吧
Lodash 是一個功能強大且廣泛使用的 JavaScript 實用庫,提供了大量有用的函數來處理陣列、物件、字串、數字等資料結構。Lodash 的設計目的是提高 JavaScript 開發效率,簡化重複的程式邏輯,並提供一致且高效的工具來處理常見的資料操作。
像是:
- 陣列操作 (Array):過濾、轉換、排序和合併陣列
- 物件操作 (Object): 對 JavaScript 物件進行深度拷貝、合併、篩選和轉換
- 函數操作 (Function):處理節流 (throttling)、防抖 (debouncing) 和函數柯里化 (currying) 等場景
- 集合操作 (Collection):提供了函數來遍歷、篩選和整理數據
還有更多重要功能,反正就是輕量又好用!
Demo 使用 Lodash
先使用最簡單的方式 (CDN) 載入 Lodash
1
2
3
4
5
6
7
8
9
10
11
12
13
14
15
16
17
18
19
20
21
22
23
24
25
26
27
28
29
30
<!DOCTYPE html>
<html lang="en">
<head>
    <meta charset="UTF-8">
    <meta name="viewport" content="width=device-width, initial-scale=1.0">
    <title>Lodash Shuffle Example</title>
    <script src="https://cdn.jsdelivr.net/npm/lodash@4.17.21/lodash.min.js"></script>
</head>
<body>
    <h1>Array Shuffle Example</h1>
    <div>
        <p>Original Array: <span id="original-array"></span></p>
        <p>Shuffled Array: <span id="shuffled-array"></span></p>
    </div>

    <script>
        // 定義一個 array
        const array = [1, 2, 3, 4, 5, 6, 7, 8, 9];

        // 在原始 array 顯示
        document.getElementById('original-array').innerText = JSON.stringify(array);

        // 使用 lodash 的 shuffle 函數
        const shuffledArray = _.shuffle(array);

        // 顯示 shuffle 後的結果
        document.getElementById('shuffled-array').innerText = JSON.stringify(shuffledArray);
    </script>
</body>
</html>
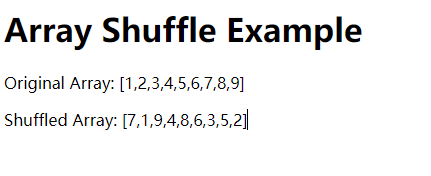
執行結果,可以看到 array 被做了 shuffle
使用 webpack 打包
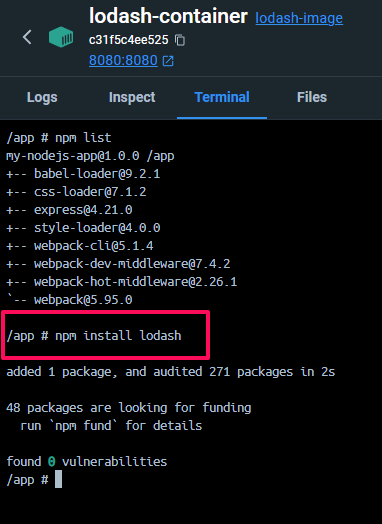
使用 npm 下載 lodash 模組, 指令如下
1
npm install lodash
把上面 javascript 部分獨立寫成一個檔案
index.js -> 後續打包的 entry
1
2
3
4
5
6
7
8
9
10
11
12
13
import _ from 'lodash';

// 定義一個 array
const array = [1, 2, 3, 4, 5, 6, 7, 8, 9];

// 在原始 array 顯示
document.getElementById('original-array').innerText = JSON.stringify(array);

// 使用 lodash 的 shuffle 函數
const shuffledArray = _.shuffle(array);

// 顯示 shuffle 後的結果
document.getElementById('shuffled-array').innerText = JSON.stringify(shuffledArray);
webpack.config.js -> 告訴 webpack 該如何打包
1
2
3
4
5
6
7
8
9
10
11
12
13
14
15
16
17
18
19
20
21
22
23
24
25
26
27
28
const path = require('path');

module.exports = {
  entry: ['./public/index.js'], // 入口文件,處理主要的邏輯
  output: {
    filename: 'bundle.js', // 輸出打包的 JavaScript 文件
    path: path.resolve(__dirname, 'public/dist'), // 將文件輸出到 public/dist 目錄
    publicPath: '/dist/', // 讓 Express 可以找到這個路徑
  },
  module: {
    rules: [
      {
        test: /\.css$/, // 處理 CSS 文件
        use: ['style-loader', 'css-loader'],
      },
      {
        test: /\.js$/, // 處理 JavaScript 文件
        exclude: /node_modules/,
        use: {
          loader: 'babel-loader', // 如果需要轉譯 ES6+ 語法
        },
      },
    ],
  },
  devtool: 'source-map', // 方便開發時除錯
  mode: 'production', // 可根據環境設置 development 或 production
};
package.json -> 描述 npm 下載的模組
1
2
3
4
5
6
7
8
9
10
11
12
13
14
15
16
17
18
19
20
{
  "name": "my-nodejs-app",
  "version": "1.0.0",
  "description": "A simple Node.js web server",
  "main": "server.js",
  "scripts": {
    "build": "webpack --mode production"
  },
  "dependencies": {
    "babel-loader": "^9.1.3",
    "css-loader": "^7.1.2",
    "express": "^4.17.1",
    "lodash": "^4.17.21",
    "style-loader": "^4.0.0",
    "webpack": "^5.94.0",
    "webpack-cli": "^5.1.4",
    "webpack-dev-middleware": "^7.4.2",
    "webpack-hot-middleware": "^2.26.1"
  }
}
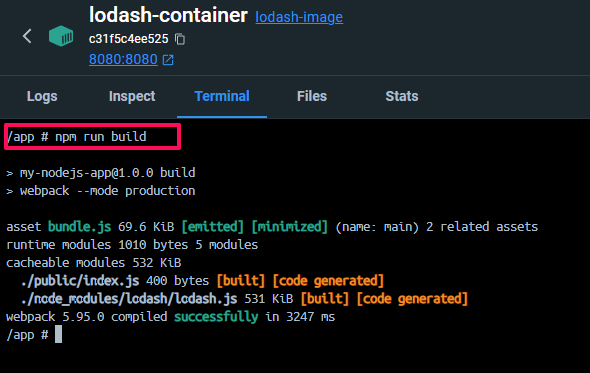
下指令打包吧
將 html 改載入打包後的 bundle.js
1
2
3
4
5
6
7
8
9
10
11
12
13
14
15
16
17
<!DOCTYPE html>
<html lang="en">
<head>
    <meta charset="UTF-8">
    <meta name="viewport" content="width=device-width, initial-scale=1.0">
    <title>Lodash Shuffle Example</title>
</head>
<body>
    <h1>Array Shuffle Example</h1>
    <div>
        <p>Original Array: <span id="original-array"></span></p>
        <p>Shuffled Array: <span id="shuffled-array"></span></p>
    </div>

    <script src="dist/bundle.js"></script>
</body>
</html>
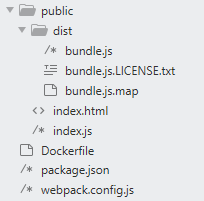
打包後所有的檔案如下
使用 webpack 打包的好處
看到這裡你心中一定有個疑問,原本使用 CDN 的方式這麼簡單,為了改成 webpack 的打包,還要新增這麼多檔案,到底有啥好處? 沒錯,如果小型的服務可能只有幾個外部 script 需要載入,這樣也沒有什麼管理問題。
但是如果專案開始變大,引入外部 script 或是其他資源時,就很容易漏東漏西,很麻煩的。
webpack 打包的主要優點
- 模組化管理:Webpack 支持將應用拆分為模塊,讓你可以根據需要將 JavaScript、CSS、圖像等各種資源作為模塊引入,並且每個模塊只負責一個功能,從而提高代碼的可維護性。
- 自動化:Webpack 可以自動處理文件依賴,將項目中的模塊按照依賴關係進行打包,減少了手動管理資源的麻煩。
- 文件壓縮與優化:Webpack 內置功能或透過插件,能將代碼進行壓縮(如 UglifyJS)和優化,生成的文件體積更小,從而提高加載速度。
有空試試看吧!